- Digitális detox a Nokiától
- Honor Magic6 Pro - kör közepén számok
- Yettel topik
- Huawei P30 Pro - teletalálat
- Android alkalmazások - szoftver kibeszélő topik
- Készülőben a Xiaomi 2021-es csúcsmodelljeinek HyperOS frissítése
- Samsung Galaxy A54 - türelemjáték
- Honor Magic5 Pro - kamerák bűvöletében
- Fotók, videók mobillal
- Netfone
Hirdetés
-

Kicsit extrémre sikerült a Hyte belépője a készre szerelt vízhűtések világába
ph A cég megoldása centralizált vezérelhetőséggel, masszív radiátorral és robusztus ventilátorokkal igyekszik vásárlásra csábítani.
-


Saját Redmi Note 13 Pro+ a világbajnok focicsapatnak (és indiai rajongóiknak)
ma Argentína nemzeti válogatottjának mezével díszítik az új Redmi különkiadást.
-


Xbox Game Pass [2024] - A májusi lista
gp Az elkövetkező időszakban többek között megkapjuk a Kona II Brume című játékot.


-

Mobilarena
Okos Otthon összefoglaló

Új hozzászólás Aktív témák
-
#331
 balibatyo78
csendes tag
balibatyo78
csendes tag
balibatyo78
csendes tag
Sziasztok!
Most fedeztem fel ezt a topikot a napokban. Örülök hogy végre létezik ilyen.
 Én kb 2 éve használom a Domoticz-ot MySensors-al. Előtte Openhab volt, de az nekem nem vált be, nem fejlődött olyan intenzíven mint a Domoticz.
Jelen konfigom:
RPI 2-n raspbian alatt megy a legfrissebb béta domoticz, illetve Node Red. A PI-n USB-n van egy RF-LINK gateway (433Mhz-en), egy Zwave.Me stick, és a MySensors serial GW. Wifin van egy xiaomi gateway. Xiaomi-hoz most érkeznek még szenzorok. Jelenleg nekem vannak rádiós dugaljak, mysensors-os dimmerek, hőmérséklet érzékelők, relé panelek. Elektromos fűtésem van, annak a vezérlése egész télen szépen ment domoticz-ról. -
#334
balibatyo78
csendes tag
Yoshida
#333
balibatyo78
csendes tag
A ttyAMA0 a PI GPIO tüskéin lévő soros port (RX,TX) Amit te belinkeltél leírást, az az SPI-buszos átjáró. Ha USB-n csatlakoztatsz mondjuk egy Arduino nanoval egy serial gateway-t akkor az ttyUSB0-ként kell hogy megjelenjen a domoticz felületén. egyéb parancssoros dolgokra ilyenkor nincs szükség.
Amivel rengeteget sz*vtam hogy a USB-soros átalakító IC-k nem mindegyik elég gyors, és téveszt. ha több csomagot küldök be a gateway-nek, akkor téveszt, maradnak ki infók. Egyedül a CH340-es chippel szerelt nanók váltak be ilyen átjáróhoz, vagy pedig az itead-ról mostmár rendeltem egy sensebender gateway-t, ami az ethernetet is tudja, de egyenlőre sorosként használom. Nem nagyon favorizálom az USB-s átjárókat, mert ha újraindítom a málnát akkor keverednek a soros port címei. Igaz össze lehet bind-olni, de ha cserélek valamit, akkor megint bukik minden.
-
#339
balibatyo78
csendes tag
Yoshida
#338
balibatyo78
csendes tag
Igazából én nem sok értelmét látom a DC-DC konverternek. a szenzorok az nrf24 és az atmega elketyeg 1,8V-tól. Addig úgy sem lehet leengedni az elemet, mert ott már nincs power ami az adáshoz kell. Az atmegához pedig sensebender bootloadert használok 8Mhz-en. Azt még tesztelem, hogy mekkora az a fesz amikor még biztonságosan elküldi az adatot. de sajnos ahány féle elem gyártó, annyiféle elem. CR123A típust használok.
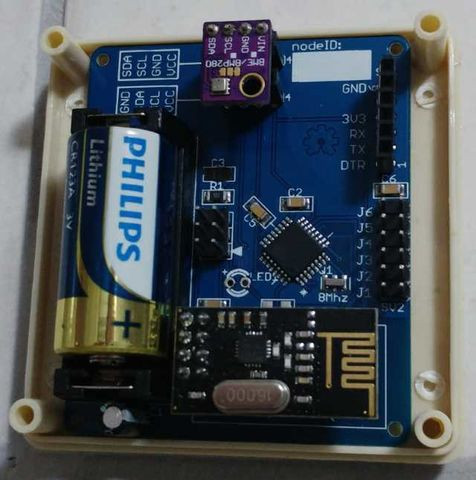
Nekem így nég ki egy beltéri szenzor, amin 2 féle I2C kiosztás van:Jut eszembe! Ha valaki tudja, honnan lehet olyan nrf24l01 rádiót venni, ahol az antenna végén nincs az a pici pötty, az érdekelne. sajnos azt vettem észre, hogy ez a sorozat, ami a képen is van, nagyon vacak a rádió térereje. A GND réteg jobban belóg az antennához. Ez nekem már 5 méteren is okozott hibákat, és a kommunikáció is jóval lassabb.
[ Szerkesztve ]
-
#344
balibatyo78
csendes tag
BSOD
#343
balibatyo78
csendes tag
Hát, ez nagyon változó. Sok dologtól függ. (mennyi időközönként ébred a cucc, mennyi adatot küldök be) Nekem még csiszolni kell a szoftveren, ha tizedeket billeg a hőmérséklet, akkor ne küldje folyamatosan. Kollegámnak 2db AA ceruza elemről tavaly február óta megy. Nekem van egy BME280 ami 1 percenként ébred, márc 15 óta megy, Induláskor volt az elem 2,943V most pedig 2.931V, de ez nem új elem.
Ez a feszültség log az övé. Millivoltban: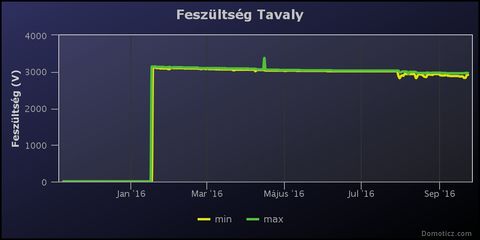
-
#346
balibatyo78
csendes tag
balibatyo78
csendes tag
Csak érdekesség képpen, a MySensors protokollal foglalkozó srácok ide gyüjtik a projekteket:
Van sok jó ötlet.

-
#351
balibatyo78
csendes tag
Yoshida
#350
balibatyo78
csendes tag
Nekem sosem volt ilyen baj, hogy az arduino gyorsabban éled fel. Ha így is van, mert így van, mikor a domoticz megnyitja azt a soros portot amin a gateway van, akkor az arduino rebootol egyet.próbáld ki, mikor PC-n van a gateway, és a soros portnak átállítos pl a sebességét. Simán újraindul. De ha nem is indulna újra akkor is ha érkezik egy mysensors üzenet a rádióra, ő azonnal továbbítja a málnának soroson. Szoval onnan a Domoticz látja. Nálad valami más dolog lehet szerintem.
Igen, ez az USB hozzárendelés működik, én így használom a sok soros cucc miatt.
Ezt a VNC-s dolgot nem értem. Te használod a raspbian grafikus felületét? Én még soha nem dugtam monitort a málnára. simán SSH-val lehet mindent konfigolni.
-
#363
balibatyo78
csendes tag
fecus
#362
balibatyo78
csendes tag
Igen, ha a bootloadert újra töltöd, akkor soroson újra tudod tölteni a progidat. de soroson töltsd újra, mert ha az MKII-vel töltöd a szoftvert is, akkor utána nem tudsz soroson programozni, csak ha újra bootloadert töltesz rá. Szóval MKII-vel csak a bootloadert. Kérdésem, hogy windows7-ed van-e? Én annó azzal szívtam sokat ilyen hibával. Mióta a win10-et használom, nincs ilyen jellegű gondom.
-
#364
balibatyo78
csendes tag
Kispósi
#357
-
#366
balibatyo78
csendes tag
fecus
#365
balibatyo78
csendes tag
Elméletileg bootloader égetéskor nem nyúl a programmemória területre, és nem törlődik. Ezért használok én nanókat amin CH340 az USB chip. Meg elemes szenzoroknál egyedi nyákot. A pro miniket elfelejtettem. Viszont az egyedi nyákos cuccokat is van amit 8mhz-es pro mini bootloaderrel használom, és mondom mióta win10-em van, nincs ez a gondom. Sajna nem sikerült rájönni mi volt a baj, de nekem is akkor jött elő, mikor sorozatgyártásban 10 nyákot programoztam fel egymás után, és abból kb 3-4 nem működött. Először azt hittem forrasztási hiba, de sajna nem az volt. Néztem szkóppal is, A DTR lábon nem jött ki a reset-et előidéző impulzus. Az FTDI-ra gyanakszom.
-
#391
balibatyo78
csendes tag
Yoshida
#390
balibatyo78
csendes tag
BME280-t kollegám összehasonlította testo-s műszerrel. Akkor volt pontos, mikor a szenzor állítva volt. Amúgy csalt. De én pl DHT22-re nem tudtam rendesen szabályozni a fűtésem. Most bmp180-al mérem a hőmérsékletet, és 0.2 c fokot ingadozik csak.
BME280-nál már azt is észrevette mikor a tenyerem kb 10cm-re tettem tőle. Század fokokat stabilan áll. Mivel ilyen srabil, nem billeg a mérés, nincs felesleges adatküldés rádiós szenzor esetén. Nekem ez a favorit. :-) -
#397
balibatyo78
csendes tag
qqzs
#396
balibatyo78
csendes tag
Létezik egy redőnyvezérlő, ami a rádiós 433Mhz-es motorokat tudja (SmartHome, Ky motor). 15db redőnyt lehet a cuccra rátanítani, van százalékos beállítási lehetőség is, illetve van benne egy kísérleti funkció, ami felismeri az adott redőny távirányítójának a jeleit, leköveti a mozgást, és ha pozícióra ért a redőny, beküldi a vezérlőnek. Ebben nincs intelligencia, kell hozzá egy központi vezérlő. pl. domoticz, vagy VERA. a kommunikáció MySensors protokollon zajlik rádión. Magyarul egy dugaljba dugható cucc, amit a lakás középpontjában bedugsz, és ő teszi a dolgát. Természetesen a vezérlőre neked kell megcsinálni a beállításokat, programokat, hogy mikor mit csináljon a redőny. de ehhez szenzorok is fognak kelleni neked. pl. fény érzékelő, stb. Ha érdekel a vezérlő, akkor tudok adni elérhetőséget privátba. Közel sinc 300 rugó, és egyből 15 redőnyös vezérlőd lesz, amire ha később akarsz rátaníthatsz még redőnyt, vagy akár nap árnyékolót is.
-
#409
balibatyo78
csendes tag
Yoshida
#407
balibatyo78
csendes tag
Igazából én is azért döntöttem a mysensors mellett mert bármilyen adatot be lehet küldeni domoticz-nak, csak a fantázia szab határt. Próbáltam az esp wifi modulokat, a nodemcu-t is. Jó jó, de macerás, fogyasztása nagy, elemes szenzort kinlódás vele csinálni, és árban se olcsóbb mint egy nrf24l01 + arduino. Eddig bármit meg tudtam mysensors-al oldani.
-
#431
balibatyo78
csendes tag
MaCS_70
#429
balibatyo78
csendes tag
Próbáltam a Nodemcu-t. Tetszik, meg minden. De. Csináltam vele egy rgbw dimmert. Mi light protokollt használtam, hogy a Domoticz-al tudjam vezérelni. A gondom hogy rendszeresen eldobta a wifit és újra kellett indítani. Aztán volt olyan problémám is vele, hogy a kínai olcsó gagyi flash-eket rak rá, és alig bír ki vagy 10-20 írást. Legutóbbi fejlesztésem közben 3db ment tönkre.
Az arduinó + nrf kombó bevált.
Ha a vezeték híve vagy akkor is a mysensors-t ajánlom rs485-ön. Nem kell rádió, és ugyanúgy megy mint a rádiós.
Régen én is vezeték párti voltam, de rádión nincs kötve a kezem. Oda ragasztom fel a falra az eszközt ahová akarom. -
#452
balibatyo78
csendes tag
fecus
#451
-
#473
balibatyo78
csendes tag
krisztián28
#470
balibatyo78
csendes tag
válasz
 krisztián28
#470
üzenetére
krisztián28
#470
üzenetére
Van a Microchip-nek egy I2C buszos 16 portos I/O bővítője (MCP23017). Arduinó alá van library. Én azt használtam 16 kimenetes relépanelemhez. Mivel 3 biten címezhető, így 8db-ot fel lehet fűzni elméletben egy buszra, ami 128 I/O pont.
[erről van szó] -
#484
balibatyo78
csendes tag
Yoshida
#482
balibatyo78
csendes tag
Nekem ez a kód van a BME280 szenzorban:
Arduino 1.8.2 felület alatt MySensors 2.1.1 library és a hardver konfig pedig a MySensors AVR boards. Abból a Sensebender micro 8Mhz-es bootloader van beégetve. Ezt telepíteni az Arduino IDE-n:
Tools - Board - Boards Manager ott megkeresed a MySensors AVR boards by MySensors-t Nekem most az 1.0.1 van telepítve. Aztán ki tudod választani a hardverek között a Sensebender boardot. Bootloader feltölt, és mehet rá soroson a sketch. Bootloaderhez viszont kell valami ISP-s kütyü amivel feltöltöd. Én USBASP-t használok./**
* The MySensors Arduino library handles the wireless radio link and protocol
* between your home built sensors/actuators and HA controller of choice.
* The sensors forms a self healing radio network with optional repeaters. Each
* repeater and gateway builds a routing tables in EEPROM which keeps track of the
* network topology allowing messages to be routed to nodes.
*
* Created by Henrik Ekblad <henrik.ekblad@mysensors.org>
* Copyright (C) 2013-2015 Sensnology AB
* Full contributor list: https://github.com/mysensors/Arduino/graphs/contributors
*
* Documentation: http://www.mysensors.org
* Support Forum: http://forum.mysensors.org
*
* This program is free software; you can redistribute it and/or
* modify it under the terms of the GNU General Public License
* version 2 as published by the Free Software Foundation.
*
*******************************
*
* REVISION HISTORY
* Version 1.0 - Henrik Ekblad
*
* DESCRIPTION
* Pressure sensor example using BMP085 module
* http://www.mysensors.org/build/pressure
*
*/
// Enable debug prints to serial monitor
#define MY_DEBUG
#define MY_NODE_ID 32
#define MY_RF24_PA_LEVEL RF24_PA_LOW
//!!!!!!!!!!!!!!!!!!!!!!!!!!!!!!!!!!!!!!!!!!!!!!!!!!!
#define MY_RF24_CE_PIN 9
#define MY_RF24_CS_PIN 10
//!!!!!!!!!!!!!!!!!!!!!!!!!!!!!!!!!!!!!!!!!!!!!!!!!!!
#define MY_RADIO_NRF24
#include <SPI.h>
#include <MySensor.h>
#include <Wire.h>
// BME280 libraries and variables
// Bosch BME280 Embedded Adventures MOD-1022 weather multi-sensor Arduino code
// Written originally by Embedded Adventures
// https://github.com/embeddedadventures/BME280
#include <BME280_MOD-1022.h>
#define BARO_CHILD 0
#define TEMP_CHILD 1
#define HUM_CHILD 2
const float ALTITUDE = 23; // <-- adapt this value to your location's altitude (in m). Use your smartphone GPS to get an accurate value!
// Sleep time between reads (in ms). Do not change this value as the forecast algorithm needs a sample every minute.
const unsigned long SLEEP_TIME = 60000;
const char *weather[] = { "stable", "sunny", "cloudy", "unstable", "thunderstorm", "unknown" };
enum FORECAST
{
STABLE = 0, // "Stable Weather Pattern"
SUNNY = 1, // "Slowly rising Good Weather", "Clear/Sunny "
CLOUDY = 2, // "Slowly falling L-Pressure ", "Cloudy/Rain "
UNSTABLE = 3, // "Quickly rising H-Press", "Not Stable"
THUNDERSTORM = 4, // "Quickly falling L-Press", "Thunderstorm"
UNKNOWN = 5 // "Unknown (More Time needed)
};
float lastPressure = -1;
float lastTemp = -1;
float lastHum = -1;
int lastForecast = -1;
const int LAST_SAMPLES_COUNT = 5;
float lastPressureSamples[LAST_SAMPLES_COUNT];
// this CONVERSION_FACTOR is used to convert from Pa to kPa in the forecast algorithm
// get kPa/h by dividing hPa by 10
#define CONVERSION_FACTOR (1.0/10.0)
int minuteCount = 0;
bool firstRound = true;
// average value is used in forecast algorithm.
float pressureAvg;
// average after 2 hours is used as reference value for the next iteration.
float pressureAvg2;
float dP_dt;
boolean metric;
MyMessage tempMsg(TEMP_CHILD, V_TEMP);
MyMessage humMsg(HUM_CHILD, V_HUM);
MyMessage pressureMsg(BARO_CHILD, V_PRESSURE);
MyMessage forecastMsg(BARO_CHILD, V_FORECAST);
float getLastPressureSamplesAverage()
{
float lastPressureSamplesAverage = 0;
for (int i = 0; i < LAST_SAMPLES_COUNT; i++)
{
lastPressureSamplesAverage += lastPressureSamples[i];
}
lastPressureSamplesAverage /= LAST_SAMPLES_COUNT;
return lastPressureSamplesAverage;
}
// Algorithm found here
// http://www.freescale.com/files/sensors/doc/app_note/AN3914.pdf
// Pressure in hPa --> forecast done by calculating kPa/h
int sample(float pressure)
{
// Calculate the average of the last n minutes.
int index = minuteCount % LAST_SAMPLES_COUNT;
lastPressureSamples[index] = pressure;
minuteCount++;
if (minuteCount > 185)
{
minuteCount = 6;
}
if (minuteCount == 5)
{
pressureAvg = getLastPressureSamplesAverage();
}
else if (minuteCount == 35)
{
float lastPressureAvg = getLastPressureSamplesAverage();
float change = (lastPressureAvg - pressureAvg) * CONVERSION_FACTOR;
if (firstRound) // first time initial 3 hour
{
dP_dt = change * 2; // note this is for t = 0.5hour
}
else
{
dP_dt = change / 1.5; // divide by 1.5 as this is the difference in time from 0 value.
}
}
else if (minuteCount == 65)
{
float lastPressureAvg = getLastPressureSamplesAverage();
float change = (lastPressureAvg - pressureAvg) * CONVERSION_FACTOR;
if (firstRound) //first time initial 3 hour
{
dP_dt = change; //note this is for t = 1 hour
}
else
{
dP_dt = change / 2; //divide by 2 as this is the difference in time from 0 value
}
}
else if (minuteCount == 95)
{
float lastPressureAvg = getLastPressureSamplesAverage();
float change = (lastPressureAvg - pressureAvg) * CONVERSION_FACTOR;
if (firstRound) // first time initial 3 hour
{
dP_dt = change / 1.5; // note this is for t = 1.5 hour
}
else
{
dP_dt = change / 2.5; // divide by 2.5 as this is the difference in time from 0 value
}
}
else if (minuteCount == 125)
{
float lastPressureAvg = getLastPressureSamplesAverage();
pressureAvg2 = lastPressureAvg; // store for later use.
float change = (lastPressureAvg - pressureAvg) * CONVERSION_FACTOR;
if (firstRound) // first time initial 3 hour
{
dP_dt = change / 2; // note this is for t = 2 hour
}
else
{
dP_dt = change / 3; // divide by 3 as this is the difference in time from 0 value
}
}
else if (minuteCount == 155)
{
float lastPressureAvg = getLastPressureSamplesAverage();
float change = (lastPressureAvg - pressureAvg) * CONVERSION_FACTOR;
if (firstRound) // first time initial 3 hour
{
dP_dt = change / 2.5; // note this is for t = 2.5 hour
}
else
{
dP_dt = change / 3.5; // divide by 3.5 as this is the difference in time from 0 value
}
}
else if (minuteCount == 185)
{
float lastPressureAvg = getLastPressureSamplesAverage();
float change = (lastPressureAvg - pressureAvg) * CONVERSION_FACTOR;
if (firstRound) // first time initial 3 hour
{
dP_dt = change / 3; // note this is for t = 3 hour
}
else
{
dP_dt = change / 4; // divide by 4 as this is the difference in time from 0 value
}
pressureAvg = pressureAvg2; // Equating the pressure at 0 to the pressure at 2 hour after 3 hours have past.
firstRound = false; // flag to let you know that this is on the past 3 hour mark. Initialized to 0 outside main loop.
}
int forecast = UNKNOWN;
if (minuteCount < 35 && firstRound) //if time is less than 35 min on the first 3 hour interval.
{
forecast = UNKNOWN;
}
else if (dP_dt < (-0.25))
{
forecast = THUNDERSTORM;
}
else if (dP_dt > 0.25)
{
forecast = UNSTABLE;
}
else if ((dP_dt > (-0.25)) && (dP_dt < (-0.05)))
{
forecast = CLOUDY;
}
else if ((dP_dt > 0.05) && (dP_dt < 0.25))
{
forecast = SUNNY;
}
else if ((dP_dt >(-0.05)) && (dP_dt < 0.05))
{
forecast = STABLE;
}
else
{
forecast = UNKNOWN;
}
// uncomment when debugging
//Serial.print(F("Forecast at minute "));
//Serial.print(minuteCount);
//Serial.print(F(" dP/dt = "));
//Serial.print(dP_dt);
//Serial.print(F("kPa/h --> "));
//Serial.println(weather[forecast]);
return forecast;
}
void setup() {
metric = getConfig().isMetric;
Wire.begin(); // Wire.begin(sda, scl)
}
void presentation() {
// Send the sketch version information to the gateway and Controller
sendSketchInfo("BME280 Sensor", "1.6");
// Register sensors to gw (they will be created as child devices)
present(BARO_CHILD, S_BARO);
present(TEMP_CHILD, S_TEMP);
present(HUM_CHILD, S_HUM);
}
// Loop
void loop() {
// need to read the NVM compensation parameters
BME280.readCompensationParams();
/* After taking the measurement the chip goes back to sleep, use when battery powered.
// Oversampling settings (os1x, os2x, os4x, os8x or os16x).
BME280.writeFilterCoefficient(fc_16); // IIR Filter coefficient, higher numbers avoid sudden changes to be accounted for (such as slamming a door)
BME280.writeOversamplingPressure(os16x); // pressure x16
BME280.writeOversamplingTemperature(os8x); // temperature x8
BME280.writeOversamplingHumidity(os8x); // humidity x8
BME280.writeMode(smForced); // Forced sample. After taking the measurement the chip goes back to sleep
*/
// Normal mode for regular automatic samples
BME280.writeStandbyTime(tsb_0p5ms); // tsb = 0.5ms
BME280.writeFilterCoefficient(fc_16); // IIR Filter coefficient 16
BME280.writeOversamplingPressure(os16x); // pressure x16
BME280.writeOversamplingTemperature(os8x); // temperature x8
BME280.writeOversamplingHumidity(os8x); // humidity x8
BME280.writeMode(smNormal);
while (1) {
// Just to be sure, wait until sensor is done mesuring
while (BME280.isMeasuring()) {
}
// Read out the data - must do this before calling the getxxxxx routines
BME280.readMeasurements();
float temperature = BME280.getTemperatureMostAccurate(); // must get temp first
float humidity = BME280.getHumidityMostAccurate();
float pressure_local = BME280.getPressureMostAccurate(); // Get pressure at current location
float pressure = pressure_local/pow((1.0 - ( ALTITUDE / 44330.0 )), 5.255); // Adjust to sea level pressure using user altitude
int forecast = sample(pressure);
if (!metric)
{
// Convert to fahrenheit
temperature = temperature * 9.0 / 5.0 + 32.0;
}
Serial.println();
Serial.print("Temperature = ");
Serial.print(temperature);
Serial.println(metric ? " �C" : " �F");
Serial.print("Humidity = ");
Serial.print(humidity);
Serial.println(" %");
Serial.print("Pressure = ");
Serial.print(pressure);
Serial.println(" hPa");
Serial.print("Forecast = ");
Serial.println(weather[forecast]);
Serial.println();
if (temperature != lastTemp)
{
send(tempMsg.set(temperature, 1));
lastTemp = temperature;
}
if (humidity != lastHum)
{
send(humMsg.set(humidity, 1));
lastHum = humidity;
}
if (pressure != lastPressure)
{
send(pressureMsg.set(pressure, 2));
lastPressure = pressure;
}
if (forecast != lastForecast)
{
send(forecastMsg.set(weather[forecast]));
lastForecast = forecast;
}
sleep(SLEEP_TIME);
}
} -
#499
balibatyo78
csendes tag
layerke
#498
-
#501
balibatyo78
csendes tag
krisztián28
#500
balibatyo78
csendes tag
válasz
krisztián28
#500
üzenetére
A SET parancsok fölé tegyél még egy SET-et, amivel a "gomb"-ot off-ra állítod. Így megszűnik a villogás.
-
#531
balibatyo78
csendes tag
DougButabi
#529
balibatyo78
csendes tag
válasz
 DougButabi
#529
üzenetére
DougButabi
#529
üzenetére
Csak bíztatni tudlak én is. Imádom a xiaomi cuccait. Nagyon jól működnek. Van hőmérséklet érzékelőm, nyomógombom, és mozgás érzékelő. Nagyon szépen teszi a dolgát mind.
-
#533
balibatyo78
csendes tag
fecus
#532
-
#646
balibatyo78
csendes tag
itanczos
#645
-
#653
balibatyo78
csendes tag
Bazs-
#651
balibatyo78
csendes tag
Esetleg node-red alatt meg lehetne nézni, hogy látszik-e a küldött csomagban a relé és a nyomogomb külön. Egész sok infó szokott ott lenni. Ha ott megvan, akkor mqtt-n át lehet adni a Domoticz-nak. Volt mikor még a Domoticz nem tudta az elem feszültséget kijelezni, de abban a csomagban már benne volt.
Xiaomi gw-re is jönnek újjabb firmware-ek, talán belekerül egyszer.[ Szerkesztve ]
-
#721
balibatyo78
csendes tag
yogee
#720
balibatyo78
csendes tag
Kb 2 évig ment rendesen. Pár hete tettem át a szenzort egy Vera edge vezérlőre.
Itt egy log róla:

Itt a szenzor beállítási oldala (Bocsi ha hosszú) :
1. Motion sensor's sensitivity:
10
 (aktuális: 10)

The lower the value, the more sensitive the PIR sensor. Available settings: 8 - 255 Default setting: 10
Last Update: 2017-09-04 16:19:56

2. Motion sensor's blind time (insensitivity):
15
 (aktuális: 15)

Period of time through which the PIR sensor is "blind" (insensitive) to motion. After this time period the PIR sensor will be again able to detect motion. The longer the insensitivity period, the longer the battery life. If the sensor is required to detect motion quickly, the time period may be shortened. The time of insensitivity should be shorter that the time period set in parameter 6. Available settings: 0 - 15 Formula to calculate the time: time [s] = 0.5 x (value + 1) Default setting: 15 (8 seconds)
Last Update: 2017-09-04 16:19:56

3. PIR sensor's pulse counter:


Sets the number of moves required for the PIR sensor to report motion. The lower the value, the less sensitive the PIR sensor. It's not recommended to modify this parameter settings. Available settings: 0 - 3 Formula to calculate the number of pulses: pulses = (value + 1) Default setting: 1 (2 pulses)
Last Update: 2017-09-04 16:19:56

4. PIR sensor's window time:


Period of time during which the number of moves set in parameter 3 must be detected in order for the PIR sensor to report motion. The higher the value, the more sensitive the PIR sensor. It's not recommended to modify this parameter setting. Available settings: 0 - 3 Formula to calculate the time: time [s] = 4 x (value + 1) Default setting: 2 (12 seconds)
Last Update: 2017-09-04 16:19:56

6. Motion alarm cancellation delay:
30
 (aktuális: 30)

Motion alarm will be cancelled in the main controller and the associated devices after the period of time set in this parameter. Any motion detected during the cancellation delay time countdown will result in the countdown being restarted. In case of small values, below 10 seconds, the value of parameter 2 must be modified (PIR sensor's "Blind Time"). Available settings: 1 - 65535 Default setting: 30 (30 seconds)
Last Update: 2017-09-04 16:19:56

8. PIR sensor operating mode:


The parameter determines the part of day in which the PIR sensor will be active. This parameter influences only the motion reports and associations. Tamper, light intensity and temperature measurements will be still active, regardless of this parameter settings. Default setting: 0 (always active)
Last Update: 2017-09-04 16:19:56

9. Night / day:
200
 (aktuális: 200)

The parameter defines the difference between night and day, in terms of light intensity, used in parameter 8. Available settings: 1 - 65535 Default setting: 200 (200 lux)
Last Update: 2017-09-04 16:19:56

12. Basic command class frames configuration:


The parameter determines the command frames sent in 1-st association group, assigned to PIR sensor. Values of BASIC ON and BASIC OFF command frames may be modified by dedicated parameters. Default setting: 0 (ON and OFF)
Last Update: 2017-09-04 16:19:56

14. BASIC ON command frame value:
255
 (aktuális: 255)

The value of 255 allows to turn ON a device. In case of the Dimmer, the value of 255 means turning ON at the last memorized state, e.g. the Dimmer turned ON at 30% and turned OFF using the value of 255, and then turned OFF, will be turned ON at 30%, i.e. the last memorized state. Available settings: 0 - 255 Default setting: 255
Last Update: 2017-09-04 16:19:56

16. BASIC OFF command frame value:
0
 (aktuális: 0)

The command frame sent at the moment of motion alarm cancellation, after the cancellation delay time, specified in parameter 6, has passed. The value of 0 allows to turn a device OFF while the value of 255 allows to turn ON a device. In case of the Dimmer, the value of 255 means turning ON at the last memorized state, e.g. the Dimmer turned ON at 30% and turned OFF using the value of 255, and then turned OFF, will be turned ON at 30%, i.e. the last memorized state. Available settings: 0 - 255 Default setting: 0
Last Update: 2017-09-04 16:19:56

20. Tamper sensitivity:
15
 (aktuális: 15)

The parameter determines the changes in forces acting on the Fibaro Motion Sensor resulting in tamper alarm being reported - g-force acceleration. Available settings: 0 - 122 (0.08 - 2g; multiply by 0.016g; 0 = tamper inactive) Default setting: 15 (0.224g)
Last Update: 2017-09-04 16:19:56

22. Tamper alarm cancellation delay:
30
 (aktuális: 30)

Time period after which a tamper alarm will be cancelled. Another tampering detected during the countdown to cancellation will not extend the delay. Available settings: 1 - 65535 Default setting: 30 (seconds)
Last Update: 2017-09-04 16:19:56

24. Tamper operating modes:


The parameter determines the behaviour of tamper and how it reports. Tamper: Tamper alarm is reported in Sensor Alarm command class. Cancellation: Cancellation is reported in Sensor Alarm command class after the time period set in parameter 22 (Tamper Alarm Cancellation Delay). Orientation: Sensor's orientation in space is reported in Fibaro Command Class after the time period set in parameter 22. Vibration: The maximum level of vibrations recorded in the time period set in parameter 22 is reported. Reports stop being sent when the vibrations cease. The reports are sent in Sensor Alarm command class. Value displayed in the "value" field (0 - 100) depends on the vibrations force. Reports to the association groups are sent using Sensor Alarm command class. Default setting: 0 (Tamper)
Last Update: 2017-09-04 16:19:56

26. Tamper alarm broadcast mode:


The parameter determines whether the tamper alarm frame will or will not be sent in broadcast mode. Alarm frames sent in broadcast mode may be received by all of the devices within communication range (if they accept such frames). Default setting: 0
Last Update: 2017-09-04 16:19:56

40. Illumination report threshold:
200
 (aktuális: 200)

The parameter determines the change in light intensity level resulting in illumination report being sent to the main controller. Available settings: 0 - 65535 (1 - 65535 lux; 0 = reports are not sent) Default setting: 200 (200 lux)
Last Update: 2017-09-04 16:19:56

42. Illumination reports interval:
0
 (aktuális: 0)

Time interval between consecutive illumination reports. The reports are sent even if there are no changes in the light intensity. Available settings: 0 - 65535 (1 - 65535 seconds; 0 = reports are not sent) Default setting: 0 (no reports) NOTE Frequent reports will shorten the battery life. Parameter value under 5 may result in blocking the temperature reports.
Last Update: 2017-09-04 16:19:56

60. Temperature report threshold:
10
 (aktuális: 10)

The parameter determines the change in level of temperature resulting in temperature report being sent to the main controller. Available settings: 0 - 255 (0.1 - 25.5C; 0 = reports are not sent) Default setting: 10 (1C)
Last Update: 2017-09-04 16:19:56

62. Interval of temperature measuring:
900
 (aktuális: 900)

The parameter determines how often the temperature will be measured. The shorter the time, the more frequently the temperature will be measured, but the battery life will shorten. Available settings: 0 - 65535 (1 - 65535 seconds; 0 = temperature will not be measured) Default setting: 900 (900 seconds) NOTE Frequent reports will shorten the battery life. Parameter value under 5 may result in blocking the illumination reports.
Last Update: 2017-09-04 16:19:56

64. Temperature reports interval:
0
 (aktuális: 0)

The parameter determines how often the temperature reports will be sent to the main controller. Available settings: 0 - 65535 (1 - 65535 seconds; 0 = reports are not sent) Default setting: 0
Last Update: 2017-09-04 16:19:56

66. Temperature offset:
0
 (aktuális: 0)

The value to be added to the actual temperature, measured by the sensor (temperature compensation). Available settings: 0 - 100 (0 to 100C) or 64536 - 65535 (-100 to -0.10C) Default setting: 0
Last Update: 2017-09-04 16:19:56

80. LED signaling mode:


The parameter determines the way in which LED behaves after motion has been detected. Values 1 and from 3 to 9 = single long blink at the moment of reporting motion. No other motion will be indicated until alarm is cancelled. Values from 10 to 18 = single long blink at the moment of reporting motion and one short blink each time the motion is detected again. Values from 19 to 26 = single long blink at the moment of reporting motion and two short blinks each time the motion is detected again. Default setting: 10 (flashlight)
Last Update: 2017-09-04 16:19:56

81. LED brightness:
50
 (aktuális: 50)

The parameter determines the brightness of LED when indicating motion. Available settings: 0 - 100 (1 - 100%; 0 = brightness determined by the ambient lighting - see parameters 82 and 83) Default setting: 50
Last Update: 2017-09-04 16:19:56

82. Ambient illumination level below which LED brightness is set to 1%:
100
 (aktuális: 100)

The parameter is relevant only when the parameter 81 is set to 0. Available settings: 0 to parameter 83 value Default setting: 100 (100 lux)
Last Update: 2017-09-04 16:19:56

83. Ambient illumination level above which LED brightness is set to 100%:
1000
 (aktuális: 1000)

The parameter is relevant only when the parameter 81 is set to 0. Available settings: parameter 82 value to 65535 Default setting: 1000 (1000 lux) NOTE The value of the parameter 83 must be higher than the value of the parameter 82.
Last Update: 2017-09-04 16:19:56

86. Minimum temperature resulting in blue LED illumination:
18
 (aktuális: 18)

This parameter is relevant only when parameter 80 has been properly configured. Available settings: 0 to parameter 87 value (degrees Celsius) Default setting: 18 (18C)
Last Update: 2017-09-04 16:19:56

87. Maximum temperature resulting in red LED illumination:
28
 (aktuális: 28)

This parameter is relevant only when parameter 80 has been properly configured. Available settings: parameter 86 value to 255 (degrees Celsius) Default setting: 28 (28C)
Last Update: 2017-09-04 16:19:56

89. LED indicating tamper alarm:


Indicating mode resembles a police car (white, red and blue). Default setting: 1 (on)
Last Update: 2017-09-04 16:19:56

2000. Wake-up Interval:
7200
 (Seconds) (aktuális: 7200)
[ Szerkesztve ]
-
#822
balibatyo78
csendes tag
yogee
#820
balibatyo78
csendes tag
Sziasztok!
Redőny vezérlés terén [Ezt] a vezérlőt ajánlanám. Tud 15 db redőnyt, mozgási időket figyelve, a százalékos mozgatást is kezeli, egy dimmer csúszkával. Annyit elárulok róla, hogy MySensors protokollt használ, szóval akár a Domoticz, akár Home assistant is kezeli. Tudom kicsit húzós az ára, de ennyi pénzért nincs 15 redőnyös vezérlő. PC szoftveren keresztül tanítható a meglévő redőnyök távvezérlő kódjai. Ez csak az egy irányú rádiós kommunikációt tudja. Csak kiküldi a parancsot a redőnyöknek. Van benne egy kísérleti funkció is, hogy figyeli ha a redőnyt távvezérlővel vezérled, akkor ő számolja az állapotot, és jelenti a központnak a pillanatnyi helyzetet.

 Én kb 2 éve használom a Domoticz-ot MySensors-al. Előtte Openhab volt, de az nekem nem vált be, nem fejlődött olyan intenzíven mint a Domoticz.


Új hozzászólás Aktív témák
- Peugeot, Citroën topik
- Wise (ex-TransferWise)
- gban: Ingyen kellene, de tegnapra
- Házimozi belépő szinten
- f(x)=exp(x): A laposföld elmebaj: Vissza a jövőbe!
- Skoda, VW, Audi, Seat topik
- Kínai, és egyéb olcsó órák topikja
- bitpork: Balatoni autós tali 2024
- RAM topik
- A pápa egyre jobban tart a romlott AI veszélyeitől
- További aktív témák...